BDL drives must be installed by a qualified mechanic. Failure to follow these instructions will void our warranty and liability.
BDL drives are to be used with stock OEM parts. Use of aftermarket parts may require other modifications or may cause starter and alignment problems.
Aftermarket starters may cause premature wear on our starter gear.
Fill out the registration card and return it promptly. Failure to do so will void the warranty.
Disconnect the battery, remove spark plugs, and support the bike so it will not fall.
Always inspect new drives and check for proper fit.
If this is a replacement application then remove the primary drive.
If this is a new construction then proceed to the applicable page.
Please note that belt drives must be installed with the utmost care. Belts must never be pinched, crimped, twisted or bent in any way: this will break down the cords and cause premature belt failure. Belts do not break unless something makes them break, therefore alignment is very critical and alignment procedures must be followed exactly. See belt tracking and starter gear problems and alignment procedure for problems that may occur.
Chains are very forgiving and will not react to misalignment a belts will.
Aftermarket frames, engines, transmissions, transmission plates and inner primarys will need careful fitment if used with a belt drive, shimming may be necessary on the engine mounts, inner primary to frame and transmission mount. Failure to check all of these areas will result in belt failure.
Chrome, painted or powder coated inner or outer primarys will cause premature belt wear because the mounting surfaces will have uneven coating thickness and will not allow the belt to track properly. When installing bolts on chrome surfaces including tranny plates, no matter how much torque is used bolts and parts will have a tendency to slip when shifting gears under load and torque.
| RED THREAD LOCKER splined shaft to splined hub | |
|---|---|
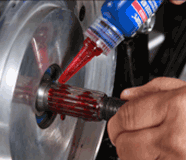 Red Thread Locker 1 |
 Red Thread Locker 2 |
| This is the proper way to apply the red thread locker that we refer to in our installation guides for all drives 1990-up. | |